
Unit Five & Spider in Motion

Updated: May 16
22nd of February 2026
In this unit, I will explore the secrets of arachnid locomotion and its principles.
Starting with research on spiders' locomotion, we can quickly learn that they move by using hydraulic pressure inside their legs to stretch them, and muscles to bend them back. This unique ability helps them to climb fast and seamlessly.
Spiders walk on eight legs, which makes their movement look very complex. However, when we study it further, do realize that it is much simpler. The easiest way to do this is to focus on each pair of leg one by one and animate them by following the basics of a two-legged walk cycle. The first and the third pair of legs move the same way, while the second and fourth pair of legs counteract them.
For my work, I will use the Raa Spider rig by Radheshatlar, which is available to download for free at highend3d.com.
For this project, I will create a 16 frames long walk cycle and once I am happy with it, will add a set to it.

The animation will be a 17-frame-long walk cycle. I started my work with the first left leg, and that was when I realised that the legs are not flat on the ground/grid, so I had to fix that before I could begin my work. The next step was to set the key contact positions at frames 1 & 17, and at frame 9, I moved it slightly backwards. At this point, the feet were only sliding back and forth, so I needed to set the 'up' position at frame 13. I also had to make sure that my Infinity curves (Pre- and Post infinity cycle) are turned by selecting all the curves on the leg so the cycle is running on an endless loop.
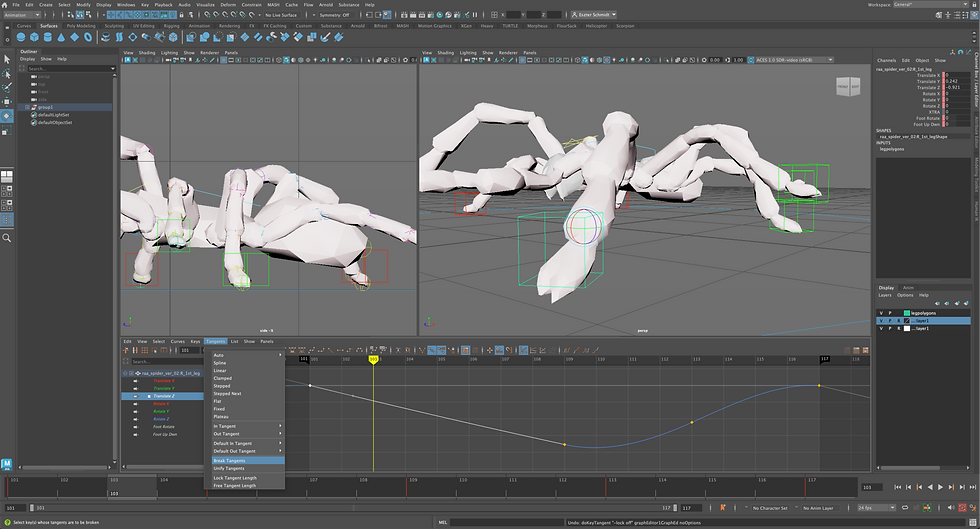
So the leg was moving backwards quite well; however, it needed to stick to the ground between frames 1 & 9 (like the ground is moving underneath) and lift up only at frame 9. In order to do that, I opened the graph editor, and by selecting the Translate Z curve, I tried to make the wave between frames 1 & 9 as straight as possible. There was no need for the leg to ease in, so breaking the Tangent at frame 1 was the best solution.
Once this leg was done, I selected all of its curves in the graph editor and Copy & Pasted them on the front right leg. At this point, the two legs were moving together, so I had to turn on Infinity curves again (this needs to be done for each controller) and move the right leg's curves 8 frames to the right. (To do that, I pressed 'A' to see all of the right leg's curves, then selected them, and by holding the shift key and the middle mouse button, moved them.) Following the first pair, I kept repeating this technique on the other legs and made adjustments in the graph editor where required.

When all four pairs of legs were moving correctly, I had to add motion to the body. This was quite simple. I selected the main body control and at frames 1, 9 & 17 I moved the body up, and at frames 5 & 13 I moved it down. Following these steps, the spider had a more flexibility but back part named the 'hip' on the body control still moved in sync with the body. I continued to add up & down motion to it;however, it need to oppose the body's movement. At frames 1, 9 & 17, I rotated it down, and at frames 5 & 13, I rotated it up. Once this was done, I selected the hip control curves in the graph editor and offset them by two frames to the right. At first, the motion was over-exaggerated, so I had to adjust it in the graph editor.

At this point, the spider's motion was much better, and only the pincers and fangs needed some motion. I went ahead to create the same opposing motion as with the hip. When the body was up, the pincers had to go down, and when the body was down, the pincers had to go up. Then, to create an overlapping motion, I selected the curve in the graph editor again, turned the Infinity curves on and moved the wave to the right by two frames. The pincers also need a bit of side to side motion, so to save time, I Copy & Pasted the up & down waves on the side motion. This technique was also great to be used for the fangs; however, after copy & pasting, I offset the waves by two frames to the right, so the fangs' and the pincers' motions were overlapping.
I was quite happy with the walk cycle, so it was time to place it into a little set. Turbosquid is always a great place to search for environments and props, and there is plenty of material available for free. My idea was to place the spider on a tree and take a short walk. I found a spooky tree model created by SR Kerala, and it proved to be perfect for my scene. Then I created a camera view starting with a close up and slowly moving away viewing the spider's crawl along the branch of the giant tree.
Resources:
Wikipedia contributors (n.d.) Arachnid locomotion. Wikipedia. Available at: Wikipedia article
YouTube (n.d.) [Video]. Available at: YouTube video


Comments